
Optimize your website's security and data integrity by addressing the vulnerability of forms, the primary avenue for user interaction. In the digital landscape, forms are highly prone to fraud and spam attacks by bots. Hence, it is imperative for every website to have a robust infrastructure that efficiently safeguards against bot attacks.
Leverage the power of Google reCAPTCHA, a complimentary bot identification service from Google, ensuring the authenticity of form submissions. By presenting interactive challenges within forms, this innovative tool effectively discerns between genuine human users and automated bots. The implementation of Google reCAPTCHA serves as a vital defense mechanism, proactively preventing fraudulent activities and spam attacks initiated by online bots, thereby enhancing the security and integrity of your website.
Here is a step by step guide to seamlessly integrate Google reCAPTCHA into your Laravel forms to enhance your website’s security as you fortify it against fraud and spam attacks orchestrated by online bots.
In this article, we'll demonstrate the integration of Google reCAPTCHA verification into the user registration form for enhanced security and spam prevention.
Step 1: Create a new Laravel application
We will initiate a new Laravel installation using Composer. Feel free to bypass this step if you already have an existing Laravel application configured.
composer create-project laravel/laravel recaptcha
We will additionally install Laravel Jetstream and Livewire to effortlessly set up a basic authentication system. This allows us to streamline the focus on implementing Google reCAPTCHA seamlessly.
          cd recaptcha

          composer require laravel/jetstream

          php artisan jetstream:install livewire
Configure your database and update the credentials in the .env file. Proceed to execute the migrations to ensure proper setup.
php artisan migrate
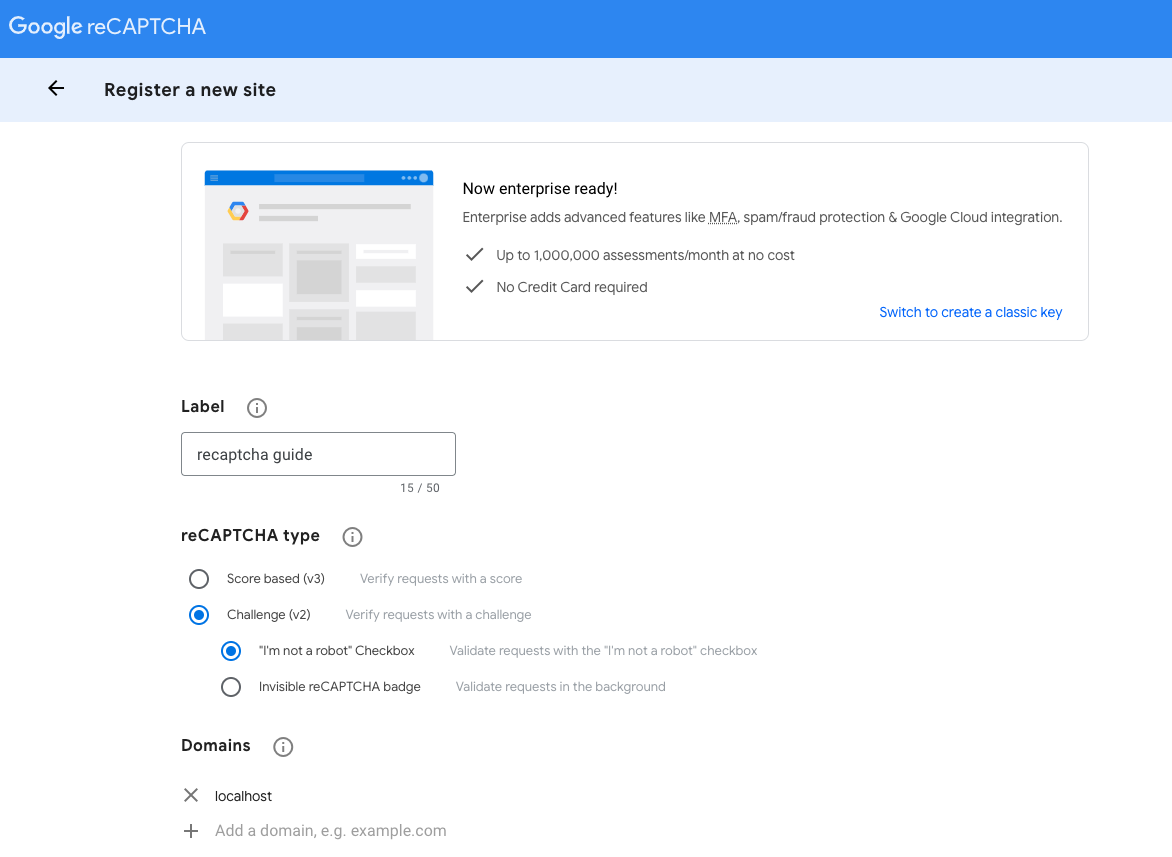
Step 2: Register the site in the Google reCAPTCHA admin Account.
We will navigate to the reCAPTCHA admin account, where we'll register the site domain and obtain the site key and site secret. Since we're operating from localhost in this scenario, we'll register 'localhost' as the domain.
Now, proceed to obtain the site key and site secret.
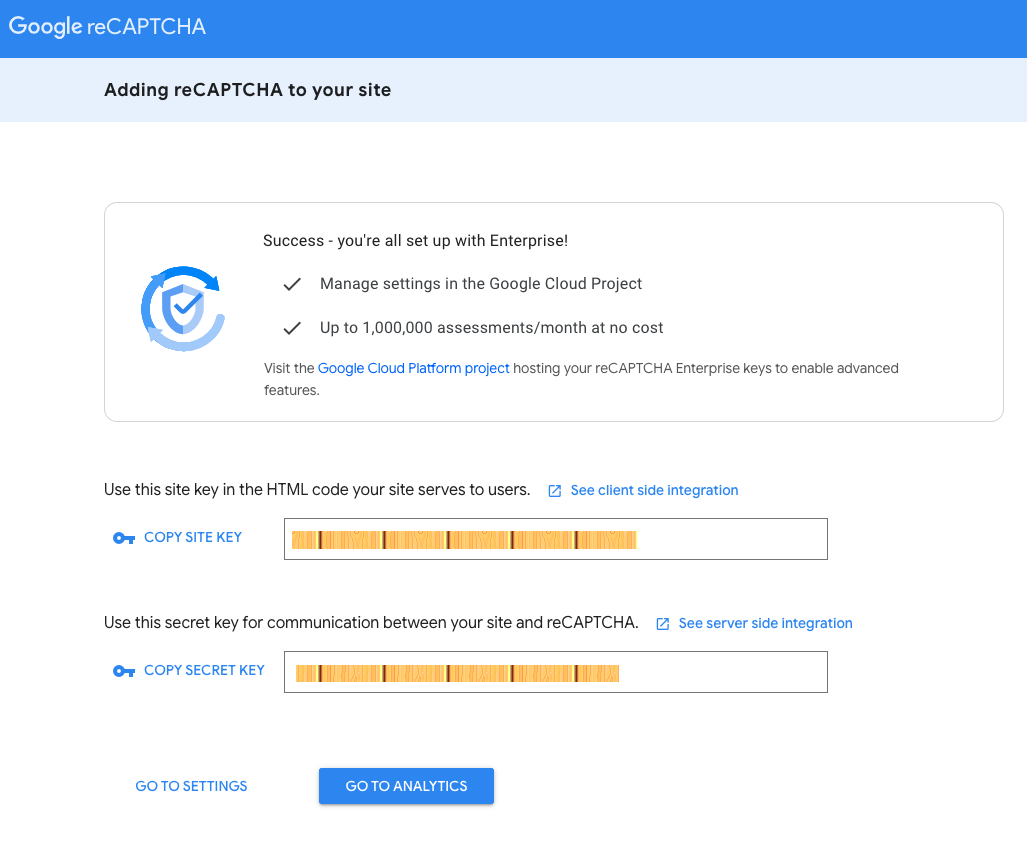
Next, copy the SITE KEY and SECRET KEY, then paste them into the .env file of your Laravel project.
          RECAPTCHA_SITE_KEY=site key
          RECAPTCHA_SECRET_KEY=secret key
Step 3: Integrate Google reCAPTCHA functionality into the Register page
Initially, let's link the reCAPTCHA JavaScript file in the guest layout of our application.
The reCAPTCHA JavaScript file, provided by Google, can be easily incorporated into our website by linking it through a script tag in the head of our webpage.
<script src="https://www.google.com/recaptcha/api.js" async defer>
We will include the script in the head tag of the guest layout located at 'resources/views/layouts/guest.blade.php'.
<html lang="{{ str_replace('_', '-', app()->getLocale()) }}">
    <head>
        <meta charset="utf-8">
        <meta name="viewport" content="width=device-width, initial-scale=1">
        <meta name="csrf-token" content="{{ csrf_token() }}">

        <title>{{ config('app.name', 'Laravel') }}


        <link rel="preconnect" href="https://fonts.bunny.net">
        <link href="https://fonts.bunny.net/css?family=figtree:400,500,600&display=swap" rel="stylesheet" />


        <script src="https://www.google.com/recaptcha/api.js" async defer>


        @vite(['resources/css/app.css', 'resources/js/app.js'])


        @livewireStyles
    </head>
    <body>
        <div class="font-sans text-gray-900 antialiased">
            {{ $slot }}
        </div>

        @livewireScripts
    </body>
</html>
Next, let's add the 'g-recaptcha' div element, which is necessary for generating the reCAPTCHA checkbox.
<div class="g-recaptcha" data-sitekey="{{getenv('RECAPTCHA_SITE_KEY')}}"></div>
We will navigate to the register page (resources/views/auth/register.blade.php) and incorporate the reCAPTCHA div element into our registration form.
          <x-guest-layout>
    <x-authentication-card>
        <x-slot name="logo">
            <x-authentication-card-logo />
        </x-slot>

        <x-validation-errors class="mb-4" />

        <form method="POST" action="{{ route('register') }}">
            @csrf

            <div>
                <x-label for="name" value="{{ __('Name') }}" />
                <x-input id="name" class="block mt-1 w-full" type="text" name="name" :value="old('name')" required autofocus autocomplete="name" />
            </div>

            <div class="mt-4">
                <x-label for="email" value="{{ __('Email') }}" />
                <x-input id="email" class="block mt-1 w-full" type="email" name="email" :value="old('email')" required autocomplete="username" />
            </div>

            <div class="mt-4">
                <x-label for="password" value="{{ __('Password') }}" />
                <x-input id="password" class="block mt-1 w-full" type="password" name="password" required autocomplete="new-password" />
            </div>

            <div class="mt-4">
                <x-label for="password_confirmation" value="{{ __('Confirm Password') }}" />
                <x-input id="password_confirmation" class="block mt-1 w-full" type="password" name="password_confirmation" required autocomplete="new-password" />
            </div>
            <br/>
            <div class="g-recaptcha" data-sitekey="{{getenv('RECAPTCHA_SITE_KEY')}}"></div>


            @if (Laravel\Jetstream\Jetstream::hasTermsAndPrivacyPolicyFeature())
                <div class="mt-4">
                    <x-label for="terms">
                        <div class="flex items-center">
                            <x-checkbox name="terms" id="terms" required />

                            <div class="ms-2">
                                {!! __('I agree to the :terms_of_service and :privacy_policy', [
                                        'terms_of_service' => '<a target="_blank" href="'.route('terms.show').'" class="underline text-sm text-gray-600 hover:text-gray-900 rounded-md focus:outline-none focus:ring-2 focus:ring-offset-2 focus:ring-indigo-500">'.__('Terms of Service').'</a>',
                                        'privacy_policy' => '<a target="_blank" href="'.route('policy.show').'" class="underline text-sm text-gray-600 hover:text-gray-900 rounded-md focus:outline-none focus:ring-2 focus:ring-offset-2 focus:ring-indigo-500">'.__('Privacy Policy').'</a>',
                                ]) !!}
                            </div>
                        </div>
                    </x-label>
                </div>
            @endif

            <div class="flex items-center justify-end mt-4">
                <a class="underline text-sm text-gray-600 hover:text-gray-900 rounded-md focus:outline-none focus:ring-2 focus:ring-offset-2 focus:ring-indigo-500" href="{{ route('login') }}">
                    {{ __('Already registered?') }}
                </a>

                <x-button class="ms-4">
                    {{ __('Register') }}
                </x-button>
            </div>
        </form>
    </x-authentication-card>
</x-guest-layout>
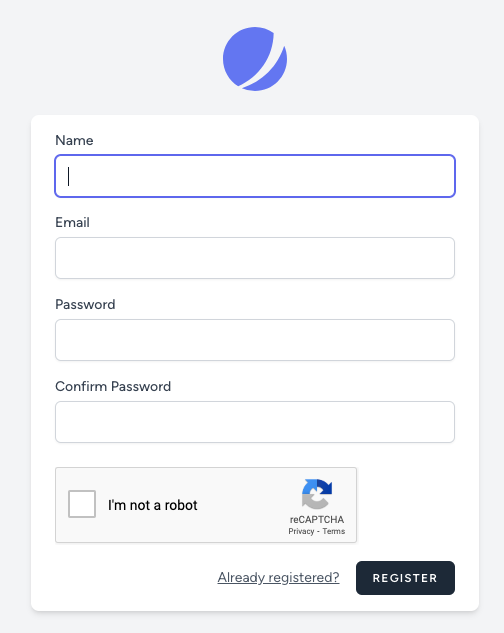
This step will generate the reCAPTCHA checkbox within the register form.
Step 4: Backend verification
Now, let's proceed with reCAPTCHA verification in the backend. The 'g-recaptcha' div translates to the 'g-recaptcha-response' field, submitted alongside the form. This field is utilized to validate the user's reCAPTCHA response for authenticity.
In this step, we will send an HTTP request to Google at https://www.google.com/recaptcha/api/siteverify to verify the validity of the user's response.
To implement the verification process, we will create a custom validation rule to manage the validation logic.
php artisan make:rule Captcha
Now, navigate to app/Rules/Captcha.php and update the file with the verification logic, as illustrated below.
namespace App\Rules;

use Closure;
use Illuminate\Contracts\Validation\ValidationRule;

class Captcha implements ValidationRule
{
    /**
     * Run the validation rule.
     *
     * @param  \Closure(string): \Illuminate\Translation\PotentiallyTranslatedString  $fail
     */
    public function validate(string $attribute, mixed $value, Closure $fail): void
    {
        $secret = getenv('RECAPTCHA_SECRET_KEY');
        $url = "https://www.google.com/recaptcha/api/siteverify?secret=$secret&response=$value";
        $response = file_get_contents($url);
        $response = json_decode($response);
        if(!$response->success){
            $fail('reCAPTCHA verification failed');
        }
    }
}
After establishing the validation rule, we will now integrate the validation into app/Actions/Fortify/CreateNewUser.php.
namespace App\Actions\Fortify;

use App\Models\User;
use App\Rules\Captcha;
use Illuminate\Support\Facades\Hash;
use Illuminate\Support\Facades\Validator;
use Laravel\Fortify\Contracts\CreatesNewUsers;
use Laravel\Jetstream\Jetstream;

class CreateNewUser implements CreatesNewUsers
{
    use PasswordValidationRules;

    /**
     * Validate and create a newly registered user.
     *
     * @param  array  $input
     */
    public function create(array $input): User
    {
        Validator::make($input, [
            'name' => ['required', 'string', 'max:255'],
            'email' => ['required', 'string', 'email', 'max:255', 'unique:users'],
            'password' => $this->passwordRules(),
            'terms' => Jetstream::hasTermsAndPrivacyPolicyFeature() ? ['accepted', 'required'] : '',
            'g-recaptcha-response' => ['required', 'string', new Captcha]
        ])->validate();

        return User::create([
            'name' => $input['name'],
            'email' => $input['email'],
            'password' => Hash::make($input['password']),
        ]);
    }
}
Now, you can visit the register page and test the functionality of reCAPTCHA.
Conclusion
With the aforementioned steps, you've successfully integrated Google reCAPTCHA into your Laravel forms, providing protection against fraud and spam from automated bots.


Comment
Login to comment