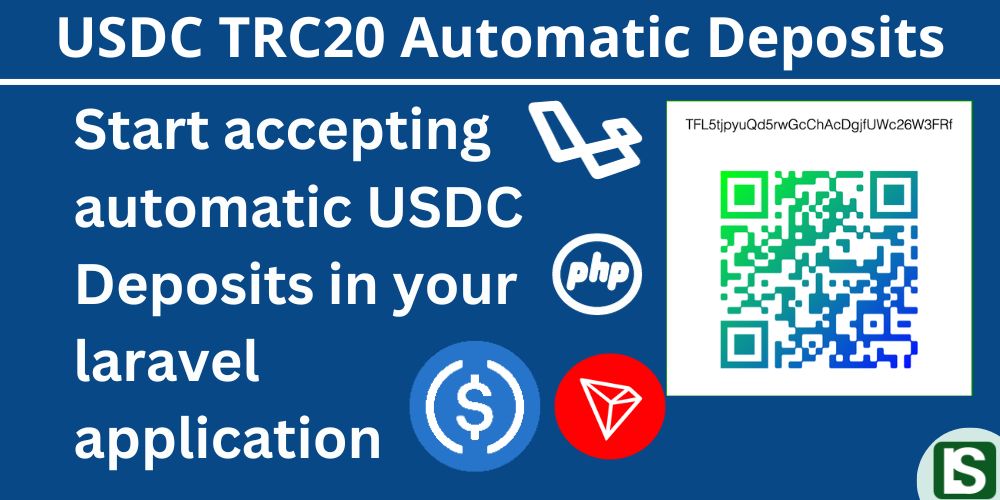
Do you have a laravel application where you accept payments from users in form of donations or subscriptions? Or it is a Laravel online shopping website and you want to start accepting USDC TRC20 payments?
Here is a step by step article on how to integrate USDC TRC20 payments in your laravel application.
Introduction
USDC TRC20 is a version of USDC stable coin issued on the TRON blockchain adhering to the TRC20 token standard.
This article is meant to be a straightforward guideline on how you can integrate USDC TRC20 payments in your laravel website and receive funds directly in your crypto wallet without having to depend on any third party payment gateway service and that right there is the power of decentralised finance.
Prerequisites:
This article expects you to be working on a laravel application with user authentication and you want to integrate usdc trc20 payments so that you can start accepting usdc payments from your users.
You are also expected to have a tron wallet preferably the Tronlink wallet that gives you access to your wallet’s private key.
You are also expected to be familiar with the laravel php framework.
With that said, it is now time to dive in and get started.
Step 1: Install required Packages
For the start, you need to install the required laravel packages and in this case we need specifically two packages ie;
IEXBase/tron-api
This is a php package for interacting with the tron blockchain.
composer require iexbase/tron-api --ignore-platform-reqs
simplesoftwareio/simple-qrcode
This is a php package for generating qr codes which makes it easier for the user to simply scan the qr code for the payment wallet address from their mobile device.
composer require simplesoftwareio/simple-qrcode "~4" --ignore-platform-reqs
Step 2: Set Up Tronlink Wallet
If you currently do not have the tronlink wallet app or extension you need to install it from tronlink.org and create a tron wallet.
Step 3: Configuration
Since you already have the laravel project by now, it's time to handle the configuration to add the required models, controller and other required files in the project.
First you need to download and unzip the USDC TRC20 AUTOMATIC PAYMENTS FOR LARAVEL zipped file and its file structure is as shown below.
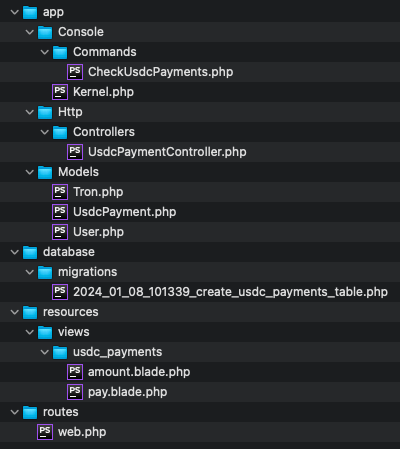
Now you have to copy the files into your laravel application in accordance with the file structure.
For some files (app/Console/Kernel.php, app/Models/User.php, routes/web.php) you just have to copy the specified lines of code into the respective files in your laravel application.
Copy files
First, you have to copy the command to your laravel project
app/Console/Commands/CheckUsdcPayments.php
Copy the controller to your project
app/Http/Controllers/UsdcPaymentController.php
Copy the two models to your project.
          app/Models/Tron.php,
          app/Models/UsdcPayment.php
Copy the migration file into your migrations folder.
database/migrations/2024_01_08_101339_create_usdc_payments_table.php
Also copy the amount.blade.php and pay.blade.php files along with their directory to your views folder
          usdc_payments/amount.blade.php,
          usdc_payments/amount.blade.php
Copy and paste code
app/Console/Kernel.php
Copy the following code into your schedule() function.
$schedule->command('app:check-usdc-payments')->everyThreeMinutes()->withoutOverlapping();
app/Models/User.php
Copy the following code into your User Model.
          public function usdcPayments(){
        return $this->hasMany(UsdcPayment::class);
    }
    public function getTotalUsdcPayments(){
        return $this->usdcPayments()->where('status', '=', 'success')->sum('amount');
    }
routes/web.php
Copy the following code to your routes/web.php file
          Route::middleware([
    'auth:sanctum',
    config('jetstream.auth_session'),
    'verified',
])->group(function () {
    Route::get('/usdc-payment', [
        \App\Http\Controllers\UsdcPaymentController::class,
        'showPayment',
    ]);
    Route::post('/usdc-payment', [
        \App\Http\Controllers\UsdcPaymentController::class,
        'initiatePayment',
    ]);
    Route::get('/pay-usdc', [
        \App\Http\Controllers\UsdcPaymentController::class,
        'pay',
    ]);
});
Run the migrations.
It is now time to run the migrations so that they can update and generate the required tables in the database.
One new table will be generated ie; usdc_payments table.
Execute the migrations by running the following artisan command below.
php artisan migrate
Export tron wallet address and private key.
The final configuration is to export your tron wallet address and the tron wallet private key and these are going to be added to the system in the Tron.php file.
For a detailed guide on how to export the tron private key, check out my article on How To Export Tron Private Key From Tronlink Wallet
app/Models/Tron.php
Now that you have exported the address and the private key, you are going to fill them in the Tron.php model (app/Models/Tron.php) as directed bellow
      private $deposit_wallet = "wallet address";
      private $deposit_key = "wallet private key";
Your tron wallet is going to handle specifically two purposes ie;
- First, it is going to be your central wallet that receives all the funds paid by the users.
- Second, it is going to be providing fees in the form of TRX to be used in the transfer of the USDC TRC20 tokens to the central wallet (itself). So make sure to atleast have a minimum balance of 100TRX in the wallet.
Step 4: Testing and Running
Now that you have everything set up, it is time to test the payments.
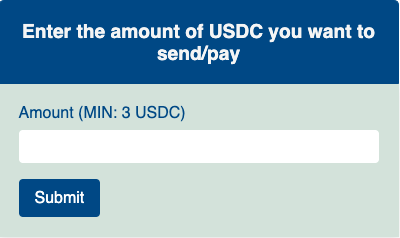
You can now login as a user and navigate to /usdc-payment and you should get a simple page where you are prompted to enter the amount you want to pay/send and proceed.
Feel free to customise the UI and the flow to meet your application requirements.
usdc_payments/amount.blade.php
Then you are going to be redirected to the next page with the payment address and the qrcode.
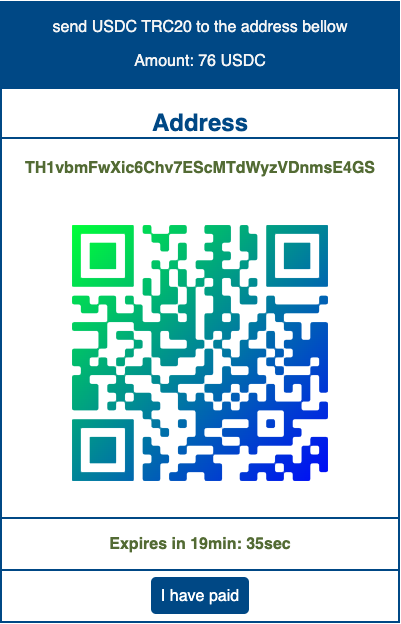
You can now make the payment to the displayed wallet address and then run the artisan command below to have the payment processed by interacting with the tron blockchain on the development environment.
Php artisan app:check-usdc-payments
You can click the “i have paid button” after sending the funds to the specified address and you should get a successful alert showing the payment was processed successfully.
With everything set up correctly, the funds should be successfully transferred to your central wallet.
The cron job
To process the payments and continuously interact with the tron blockchain, the system uses a cron job / task scheduling to run the above scheduled commands. For details on how to handle laravel task scheduling and cron job, check out the laravel docs at Laravel Scheduling
For the purpose of testing, you can run the schedules by running the following artisan command.
php artisan schedule:run
Or you can run the command directly with the artisan command below for the check-usdc-payments command.
Php artisan app:check-usdc-payments
With that said, now you should be able to take it from here and do the final touches in accordance to your application requirements.
Comment
Login to comment