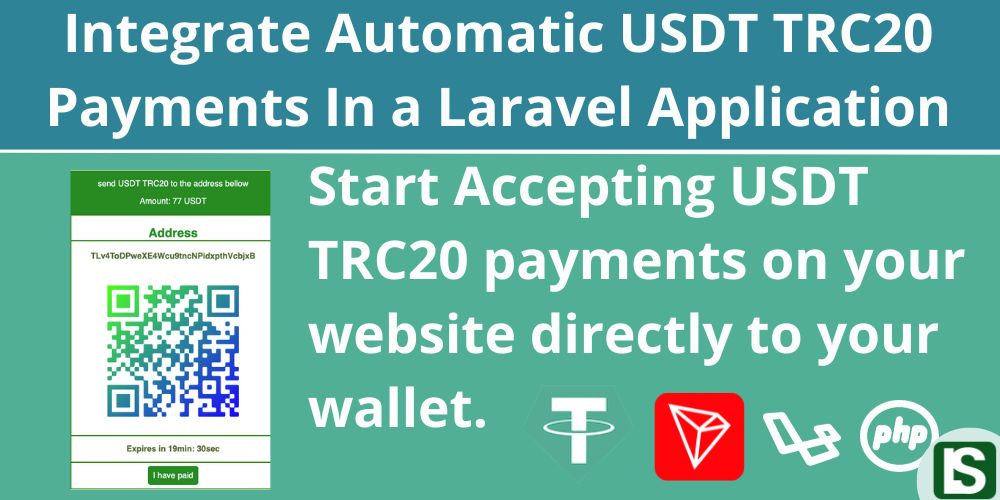
Are you running a Laravel application that involves processing user payments through donations or subscriptions? Whether you manage a Laravel-based online shopping website or aim to integrate USDT TRC20 payments, we've got you covered!
Explore our comprehensive step-by-step guide detailing the seamless integration of USDT TRC20 payments into your Laravel application.
Introduction
USDT TRC20 is a variant of the Tether (USDT) stable coin uniquely issued on the TRON blockchain, designed in accordance with the TRC20 token standard.
At present, USDT TRC20 stands as one of the most extensively utilized stable coins in online transactions and transfers, boasting an impressive daily trading volume exceeding $10 billion on average.
This guide serves as a clear and concise roadmap for seamlessly integrating USDT TRC20 payments into your Laravel website, allowing you to receive funds directly into your crypto wallet. By eliminating the reliance on third-party payment gateway services, this underscores the empowerment of decentralized finance.
Prerequisites:
This guide assumes you are actively engaged in developing a Laravel application with user authentication and are keen to integrate USDT TRC20 payments, enabling seamless acceptance of USDT payments from your user base.
Additionally, it is assumed that you possess a TRON wallet, preferably the Tronlink wallet, providing you with access to your wallet's private key.
Familiarity with the Laravel PHP framework is also presumed for a smoother understanding of the integration process.
With that said, let's dive in and get started!
Step 1: Install required Packages
To begin, you'll need to install the necessary Laravel packages. In this case, we specifically require two packages:
IEXBase/tron-api
This PHP package facilitates interaction with the TRON blockchain.
composer require iexbase/tron-api --ignore-platform-reqs
simplesoftwareio/simple-qrcode
This PHP package is designed for generating QR codes, simplifying the user experience by allowing them to easily scan the QR code for the deposit wallet address using their mobile device.
composer require simplesoftwareio/simple-qrcode "~4" --ignore-platform-reqs
Step 2: Set Up Tronlink Wallet
If you don't have the TronLink wallet app or extension installed, you can download it from TronLink and proceed to create your Tron wallet.
Step 3: Configuration
As you already have your Laravel project in place, it's time to manage the configuration by adding the necessary models, controllers, and other essential files to the project.
Begin by downloading and extracting the USDT TRC20 Automatic Payments for Laravel zipped file. The file structure is outlined below:

Now, proceed to copy the files into your Laravel application, following the designated file structure.
For certain files (app/Console/Kernel.php, app/Models/User.php, routes/web.php), simply copy the specified lines of code into the corresponding files in your Laravel application.
Copy files
To begin, copy the scheduler command to your Laravel project.
app/Console/Commands/CheckUsdtPayments.php
Copy the controller into your project.
app/Http/Controllers/UsdtPaymentController.php
Copy the two models to your project.
          app/Models/Tron.php,
          app/Models/UsdtPayment.php
Copy the migration file into your migrations folder.
database/migrations/2024_01_07_072047_create_usdt_payments_table.php
Also copy the amount.blade.php and pay.blade.php files along with their directory to your views folder
          usdt_payments/amount.blade.php,
          usd_payments/amount.blade.php
Copy and paste code
app/Console/Kernel.php
Copy the following code into your schedule() function.
$schedule->command('app:check-usdt-payments')->everyThreeMinutes()->withoutOverlapping();
The cron job
To facilitate payment processing and maintain constant interaction with the TRON blockchain, the system employs a cron job/task scheduling to execute the scheduled command mentioned above. For comprehensive guidance on managing Laravel task scheduling and cron jobs, refer to the Laravel documentation at Laravel Scheduling
For testing purposes, initiate the schedules by executing the following Artisan command.
php artisan schedule:run
Alternatively, you can directly execute the command using the Artisan command below for the 'check-usdt-payments' command.
Php artisan app:check-usdt-payments
app/Models/User.php
Copy the following code into your User Model.
          public function usdtPayments(){
        return $this->hasMany(UsdtPayment::class);
    }
    public function getTotalUsdtPayments(){
        return $this->usdtPayments()->where('status', '=', 'success')->sum('amount');
    }
routes/web.php
Copy the following code to your routes/web.php file
          Route::middleware([
    'auth:sanctum',
    config('jetstream.auth_session'),
    'verified',
])->group(function () {
    Route::get('/usdt-payment', [
        \App\Http\Controllers\UsdtPaymentController::class,
        'showPayment',
    ]);
    Route::post('/usdt-payment', [
        \App\Http\Controllers\UsdtPaymentController::class,
        'initiatePayment',
    ]);
    Route::get('/pay-usdt', [
        \App\Http\Controllers\UsdtPaymentController::class,
        'pay',
    ]);
});
Run the migrations.
Now, proceed to execute the migrations to update and generate the necessary tables in the database.
During this process, a new table will be generated, specifically the 'usdt_payments' table."
Execute the migrations by running the following artisan command below.
php artisan migrate
Export tron wallet address and private key.
The last step in configuration is to export your TRON wallet address and the TRON wallet private key, which will be added to the system in the 'Tron.php' file.
For a comprehensive guide on exporting the TRON private key, refer to my article on How To Export Tron Private Key From Tronlink Wallet
app/Models/Tron.php
Your TRON wallet will serve two specific purposes:
- Firstly, it will function as your central wallet, receiving all funds paid by the users.
- Secondly, it will provide fees in the form of TRX for facilitating the transfer of USDT TRC20 tokens to the central wallet (itself). Ensure that the wallet maintains a minimum balance of at least 100 TRX.
With the address and private key exported, proceed to fill them in the 'Tron.php' model (app/Models/Tron.php) as instructed below."
      private $deposit_wallet = "wallet address";
      private $deposit_key = "wallet private key";
Step 4: Testing and Running
With everything set up, it's time to proceed to test the payments.
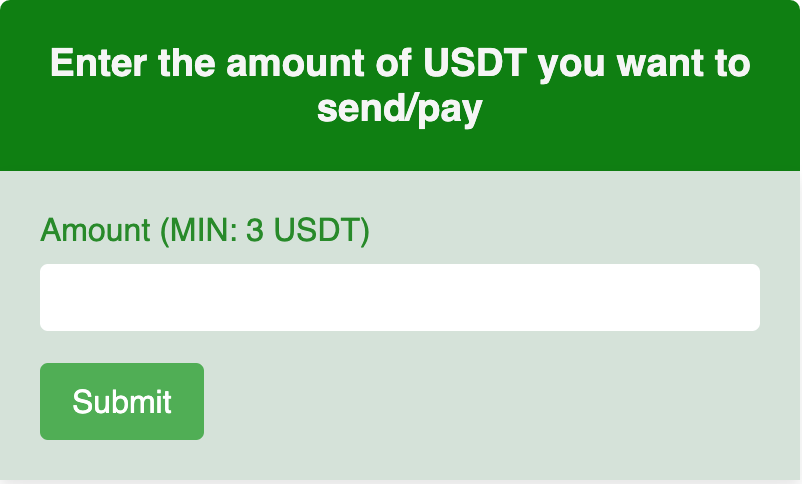
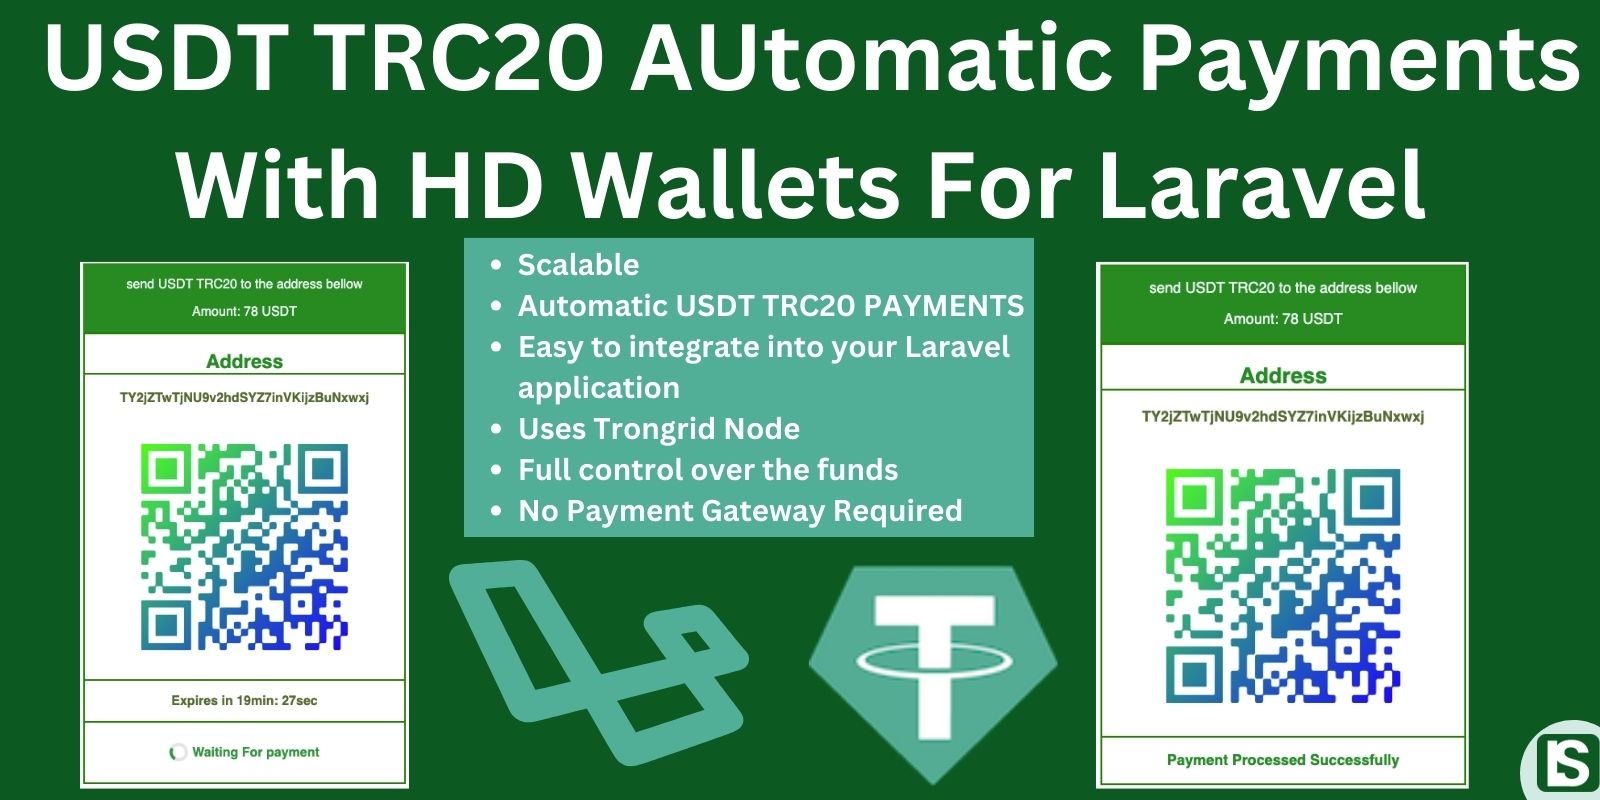
Now, log in as a user and visit /usdt-payment. You should encounter a straightforward page prompting you to enter the desired payment amount before proceeding.
Feel free to customize the user interface and flow to align with the specific requirements of your application.
usdt_payments/amount.blade.php
Next, you will be redirected to a page displaying the payment address and QR code.
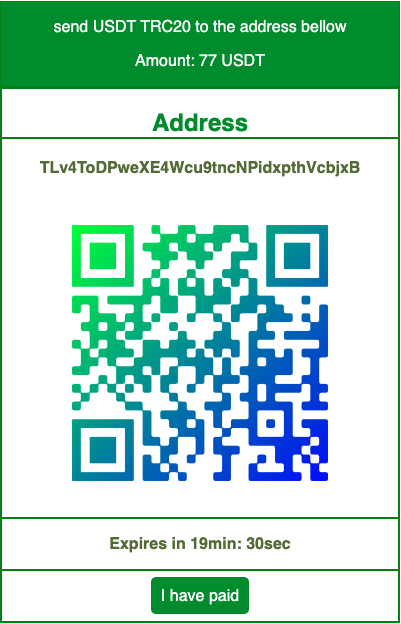
After making the payment to the displayed wallet address, execute the following Artisan command to process the payment by interacting with the TRON blockchain in the development environment
Php artisan app:check-usdt-payments
After sending the funds to the specified address, click the 'I have paid' button. You should receive a successful alert indicating that the payment was processed successfully.
With all configurations in place, the funds should be seamlessly transferred to your central wallet.
With that said, you should now be equipped to proceed and make the final adjustments in accordance with your specific application requirements.

Comment
Login to comment